
Puppet 3 Install With Unicorn & Nginx in CentOS
Обновлено 24.06.2017

centos
How to install Puppet 3 on CentOS / RHEL 6 with Unicorn & Nginx for maximum efficiency. You can read more about why Unicorn is great because it’s Unix, in short it’s a much better option than Webrick (very slow) and no more work to setup than Mongrel (in my opinion). In this tutorial I couple Unicorn withNginx for optimial puppet master performance per dollar spent.
Installing Puppet Labs RPM for CentOS 6
I use the Puppet Labs repo, you might want to use the EPEL Repo however this will install an older version of puppet and I am rolling out Puppet 3 for my servers.
rpm -ivh http://yum.puppetlabs.com/el/6/products/i386/puppetlabs-release-6-6.noarch.rpm
Install the Puppet Master:
yum install puppet-server
Here is an example of Puppet deps on a CentOS 6 x86_64 minimal install:
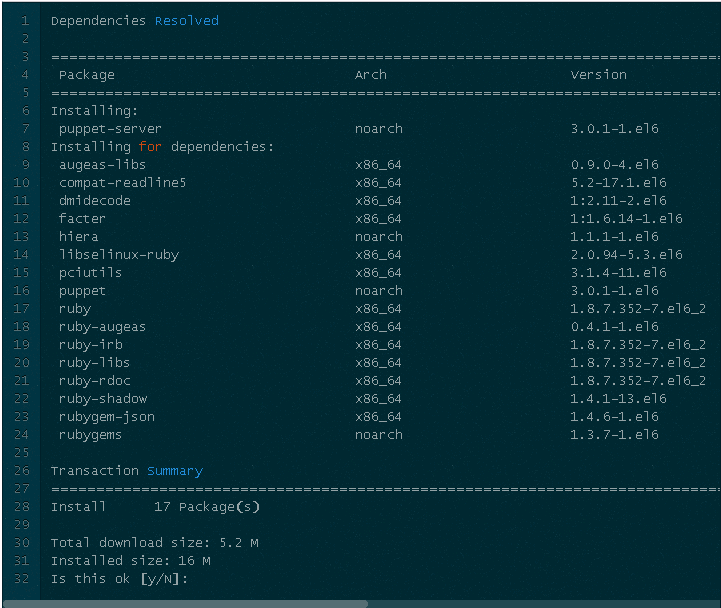
Puppet 3 Install With Unicorn & Nginx in CentOS-01
Install the key when prompted:
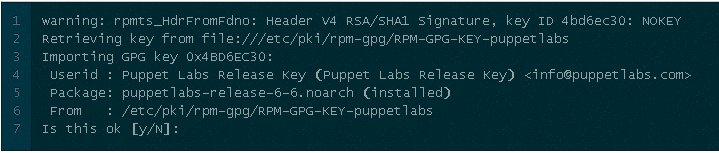
Puppet 3 Install With Unicorn & Nginx in CentOS-02
At this point open up /etc/puppet/puppet.conf (if it’s not there copy it from: /usr/share/puppet/ext/redhat/puppet.conf ) and add your server name, note this needs to be a FQDN or /etc/hosts hack like I have done in this lab.
Here is an example of my puppet.conf

Puppet 3 Install With Unicorn & Nginx in CentOS-03
Install Unicorn for the Pupper Master
unicorn is a HTTP server for Rack apps that utilizes features in Unix / Linux Kernels and in short is far more efficient than Mongrel / WEBrick, you can probably get away with using the Puppet default for now but why do half a job and implement something that is not going to scale?
In order for gem to build Unicorn, Rack & it’s deps you need to install some build tools using YUM:
Check the deps look sane and accept.
Install Unicorn via gem
Copy over the config.ru to /etc/puppet/
Create the Unicorn config file:

Puppet 3 Install With Unicorn & Nginx in CentOS-04
Test that Unicorn us running the puppet master correctly:
You should get an output similar to:
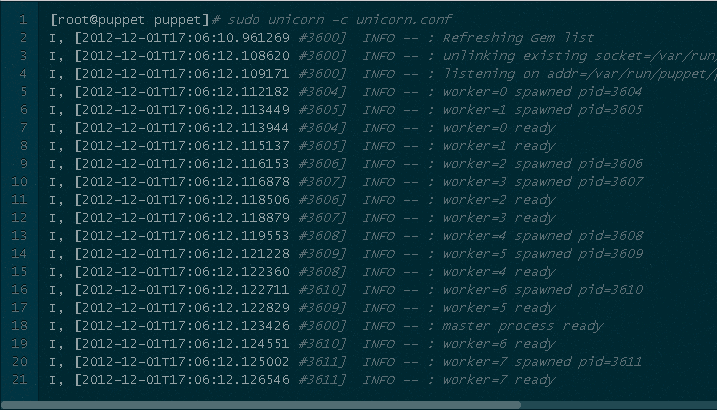
Puppet 3 Install With Unicorn & Nginx in CentOS-05
Kill the above with ctrl+c
Create an init script to start / stop the puppet master
Below is a basic init script to stop / start / restart the puppet masters unicorn process on CentOS, you can grab it from my Github here.
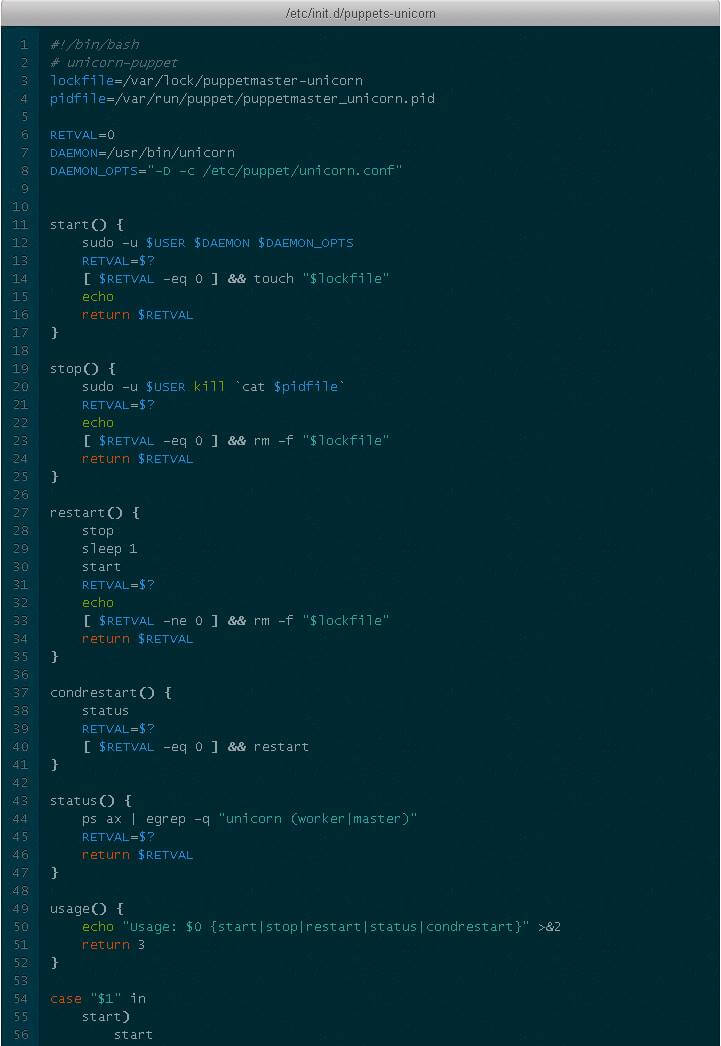
Puppet 3 Install With Unicorn & Nginx in CentOS-06
You can now stop, start, restart the puppet master’s unicorn service with:
Confirm unicorn is running:
Install Nginx for Puppetmaster Unicorn
If you don’t have it installed follow my CentOS Nginx install instructions, then drop the following config file in /etc/nginx/conf.d/ and call it puppets-unicorn:
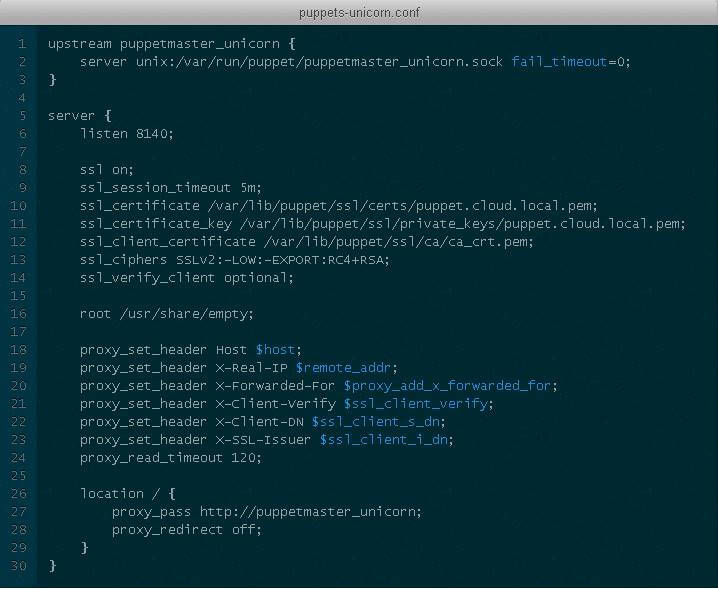
Puppet 3 Install With Unicorn & Nginx in CentOS-07
You will need to change the cert file names to match your FQDN.
Make sure the puppet unicorn service is running and start nginx:
Install Puppet client (Agent)
Next on a client (puppet Agent) machine install the Puppet Labs YUM repo and enter the following command to install the puppet client:
Configure the puppets to talk to the server
Make sure you can ping the puppetmaster & vice verse (if it’s not working the most likely cause is iptables), open up /etc/puppet/puppet.conf and add server = puppet.your.com to the [agent] section.
Here is an example of my puppet.conf:
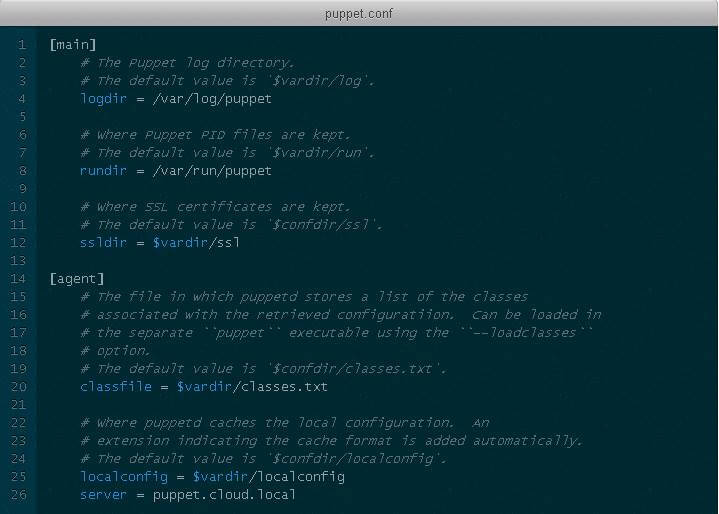
Puppet 3 Install With Unicorn & Nginx in CentOS-08
Sign the Puppet Agents Certificate
From the Agent (the client not the server) run:
Start / Restart puppet agent:
Say Hello to the puppet master (this sends the agent cert to the puppet master):
replace puppet.cloud.local with your puppet master FQDN
Normally puppet returns the following: Did not receive certificate
Next on the puppet master (NOT the agent / client) run the following command:
This should give you an output like:
Sign the puppet certificate with:
This should return a message similar to:
Test the Puppet Agent is working with the Puppet Master
To test the Puppet Agent can pull down the Puppet Masters catalog enter:
This should give you an output similar to:
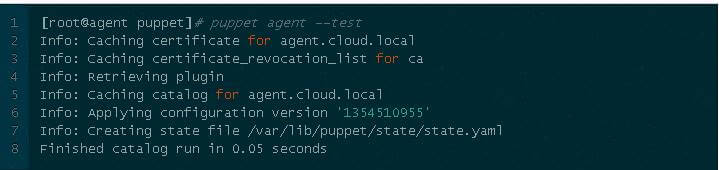
Puppet 3 Install With Unicorn & Nginx in CentOS-09
To test this futher create some manifests and confirm they deploy to your puppet agents correctly.
Enjoy your highly efficient Puppet 3 server running Unicorn & Nginx!


Добавить комментарий